| Version 10 (modified by , 7 years ago) (diff) |
|---|
This web is being updated
Introduction
OpenGnSys Version 1.0.1 only works with monolithic images. The process to incorporate an image for deploy will be:
- Register the image object in OG application and linkage with file-image from general option button "Images".
- Store the image in the repository:
- If the names match the link between the object image and the physical file image is automatic.
- Version 1.0.1 have a lot of difference with version 1.0, so if you can use version 1.0 please visit: Previous Documentation?.
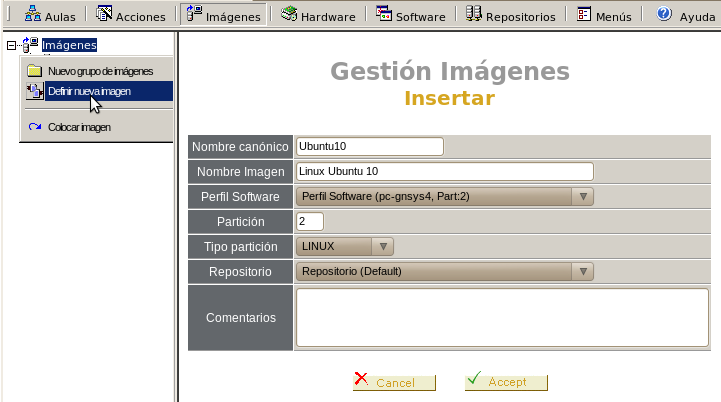
Register the Image Object in Admin Console
Access to tab Images right-click on Define New Image. We can see a form that asks the following:
- Canonical Name: File Name of image stored in the repository directory /opt/opengnsys/images without the extension.
- Image Name: Name of the image in the admin console.
- Software Profile : The software profile contains the system operating information of the image and software you have installed. It will be create to created the image or independently.
- Partition: Number of the partition where it is installed
- Partition Type: NTFS, LINUX, etc
- Repository: OpenGnSys repository where it is stored the image. The console can manage several repositories.
- Comnents: Extra information about the image.

It should be noted:
- If the names match (canonical name and file name) the link between image object and the physical file will be automatic.
- To avoid problems with canonical name, it is important try not use some specials caracters as [ spaces \ / ` ' . ]
- All fields are required, although some are not validated by the web application.
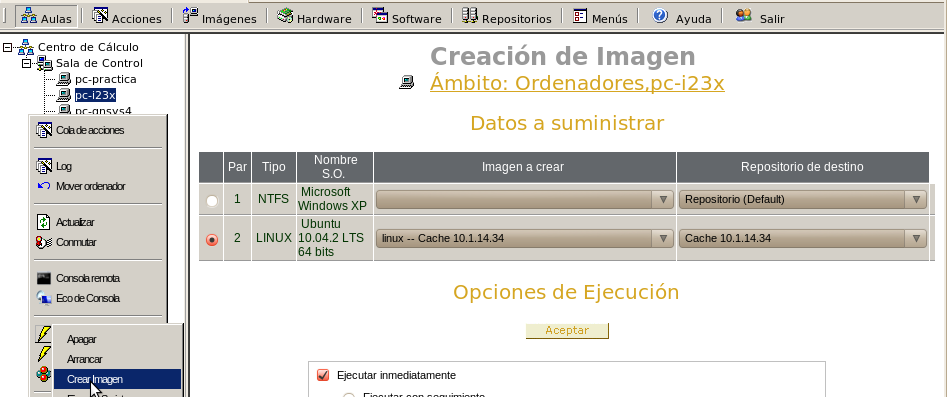
Create an image from a partition of an OpenGnSys client
Once the image is registered, we can create a partition from a computer of referenced that it is iniciated by OpenGnSys client. From the administration console in tab classrooms, click on the computer and use the command Create Image.
This allow select the partition to deploy, the image name and the repository where save it.
We note that beside the name of the image is the repository that we have associated at the time to define, this value is informational because the image is created in the repository you choose this command.

The image file will be stored in the repository in directory /opt/opengnsys/images with the canonical name finished in .img
Incorporate an image form other server or application of deploying
OpenGnSys can manage images created in other servers. It is compatible with Brutalix, HIDRA, EAC, FOG, Clonezilla and for all the images created by partclone or partimage and compressed with lzop or gzip.
Automatically, the system detect the image type, in terms of compression, deploy tool and filesystem type, so that you can restore correctly.
Copy the Image to Server
The image will be stored in /opt/opengnsys/images of the repository server.
The image must be only a file. In the case that the image would be created in multivolume mode, we should convert in a single file using the command: cat image* >> newimage.
The image name will be composed by the canonical name and the extension .img.
Depending of the situation of the image have two cases:
- If the image exists in /opt/opengnsys/images (debido a que la partición o el disco duro ha sido reutilizado)
- If the files with extensions .sum and .torrent, associated to the image, exists you will have to delete them.
- In the case that the image name have a different extension to .img, you should rename it to .img.
- If the image not exists in /opt/opengnsys/images.
- Copy with a different extension to .img.
- Rename the image to extension .img
OpenGnSys performs a series of processes to confirm the integrity of the image information stored in the file .sum and .torrent. These processes have access to the image and block it, so that if we copy the image directly with extension .img may be damaged.
The incorporation process is complete when appears in /opt/opengnsys/images the files associated to the image: for file-image.img will be the file-image.img.sum and file-image.img.torrent.
A method to verify that the embedded image will be recognized by OpenGnSys is run from a PXE client OpenGnSys the following:
(IMGogclient)root@ING2-111:/# ogGetImageInfo /opt/opengnsys/images/201011b1.img
# In this case, the info provided is:
#Deployment Tool : Compressor : Filesystem : Size Required to Restore (KB)
PARTCLONE:LZOP:NTFS:72100000
Restore an Image
We can restored images contained in the repository that has the computer assigned or placed in the cache of other clients or in other repository.
The client caches can be defined in the console and in the repository, but can not be assigned to a computer because they do not contain the client side that is on the network.
We have three ways to restore the images.
- Command Restore: Restores an image from the repository assigned to the computer via UNICAST, MULTICAST or TORRENT (in the latter two case will use the cache).
- Wizard Image Deploy. Restores an image using the cache. Brings the repository to the cache with MULTICAST or TORRENT protocols.
- Wizard Remote Partition Deploy. Use a computer client as deploy origins, allow tiliza un equipo cliente como origen de la clonación, can take the contents of a partition or an image file in the cache. Also allowed to bring a picture from the repository for unicast and serve it to other computers in the group with unicast or multicast protocol.
Checking the Size of the Cache
When you restore using the computer's destination cache, it is checked for available space to store the image, otherwise it will be deployed directly from the repository to the client computer partition by UNICAST.
Command Restore
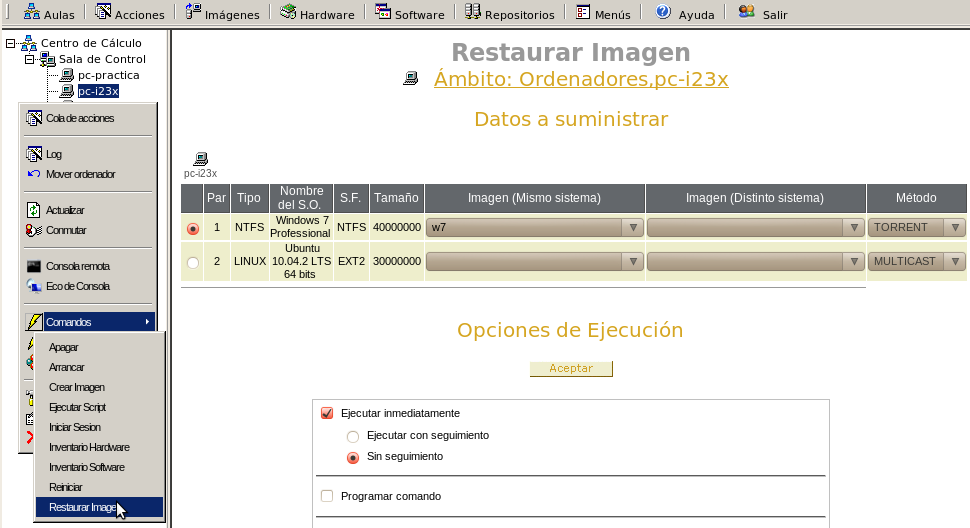
In the tab Classrooms right-click on the scope and click on Restore Image.
It shown info about computer/s partitions and the operating system.
Please give information about:
- par: target partition image.
- Image (same or different system): Restore the image you want placed in the repository that it is assigned the scope. Keep in mind that if we choose option (other system), the operating system chosen must be compatible with the file system partition (i.e. could not clone a linux system if the partition is NTFS), in that case would Format before Partition to a valid filesystem.
- Method: UNICAST, MULTICAST or TORRENT

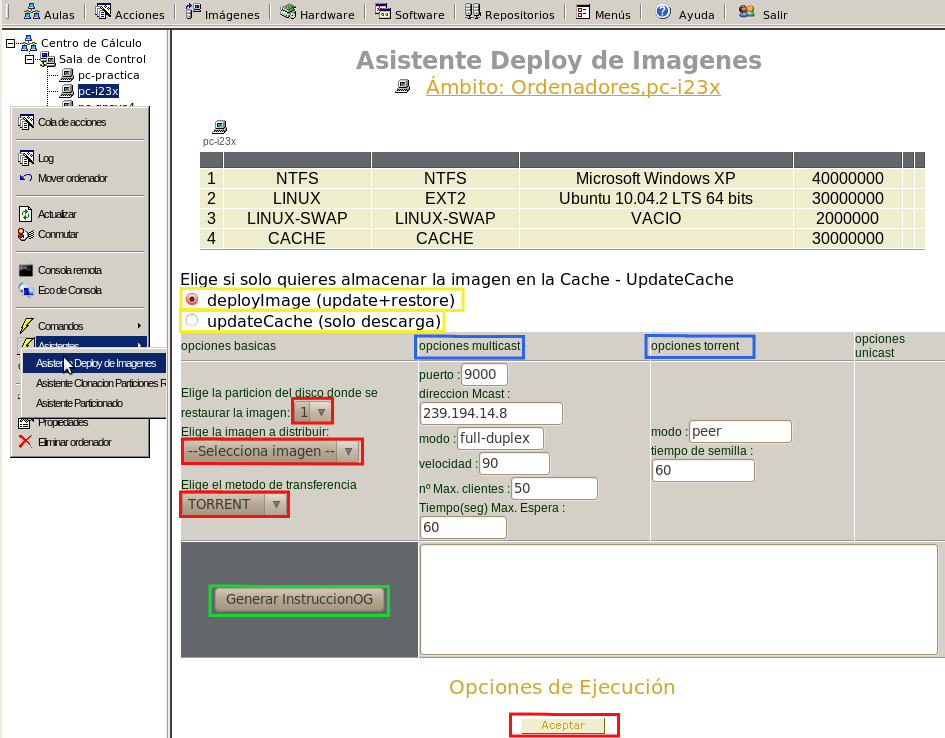
Image Deploy Wizard
- The Image Deploy Wizard has two parts; in the first one, the client's cache partition is updated with operating systems files-images from the OpenGnSys repository, and in the second one, the target partition is restored using as source the cache partition of the client computer. Also, the wizard allow separate this processes; for example updating cache from central repository when the traffic network is low. For this, you should define the "Working mode" as updateCache - only update -, or deployImage - update and restore the partition-.
- If the cache partition of the client have the image, and the system detects that it is identical to the repository, the process updateCache ends. In the case the file-image have the same name in the repository and in the partition cache of the client, but this images are not identical: the client starts updateCache process.
- Tranfers protocols for this wizard are MULTICAST, P2P and UNICAST whose properties will be modified.
To do this action, in tab classrooms right click on the scope and Image Deploy Wizard.
It shows a form that asks some basic options. Also allows us to modify the default parameters defined in the classroom for each protocol.
The options of the wizard are:
- Working mode: download the image from cache ( update cache ) or download and deploy in the partition ( deploy image )
- Partition to restore. (target) Only for working mode deploy image::
- Image to use (source)
- Protocol to use: [MULTICAST|TORRENT]
- Optional: Revise protocol parameters.
When the data are complete, click on Generate OG Instruction. This will create the code to used by clients computers and click on Accept to send them.

MULTICAST Protocol
- Port: The port where the computer that sends by MULTICAST sincronize with the clients. The values can be even values from 9000. For example: 9000, 9002, 9004, 9006, .... It is recommended use 9000, and if we have two classrooms in the same subnet for to do independent transfer, you should to assign the port 9000 to the first classroom, and 9002 to the second one.
- IP Multicast: MULTICAST address for the classroom: 239.194.x.z where x is the 2nd octect of the IP network classroom, and z is the 3rd octect of the IP network classroom. Example: If the network address of virtual_classroom_1 is 172.17.36.0 it belongs as MULTICAST IP: 239.194.17.36.
- Multicast mode: With two options: full-duplex and half-duplex (use full-duplex)
- Speed: It it the maximum speed in Mbits/second. The maximum value admited (temporaly) by the cloning engine is 90 MBits - There are tests in Gigabits networks with excellents results.
- Number of Computers: To start with multicast transfer, the server waits to connect the number of computers defined.
- Maximum waiting time: When it comes to the maximum waiting time the server starts transmission although not all computers are connected.
By default, the protocol data are defined in the classroom properties.

P2P Protocol
- Mode: Way in which the computer will behave when it is downloading the image. It can be:
- leecher: The computer not shared while is downloading the image.
- peer: The computer shared data while is downloading the image.
- seeder: Working distributed mode where a Master client is responsible of serve the image.
- Time (seconds) as seeder: Independiently of the computers P2P working mode, we can define the computer shared the complete image in cache partition gives "X" seconds to shared the image with the others computers.

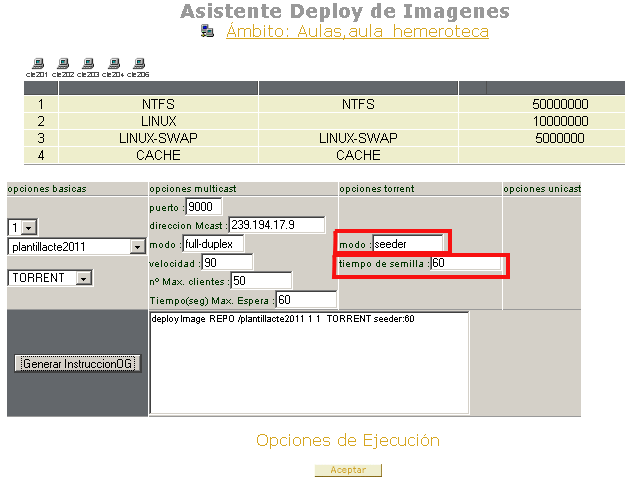
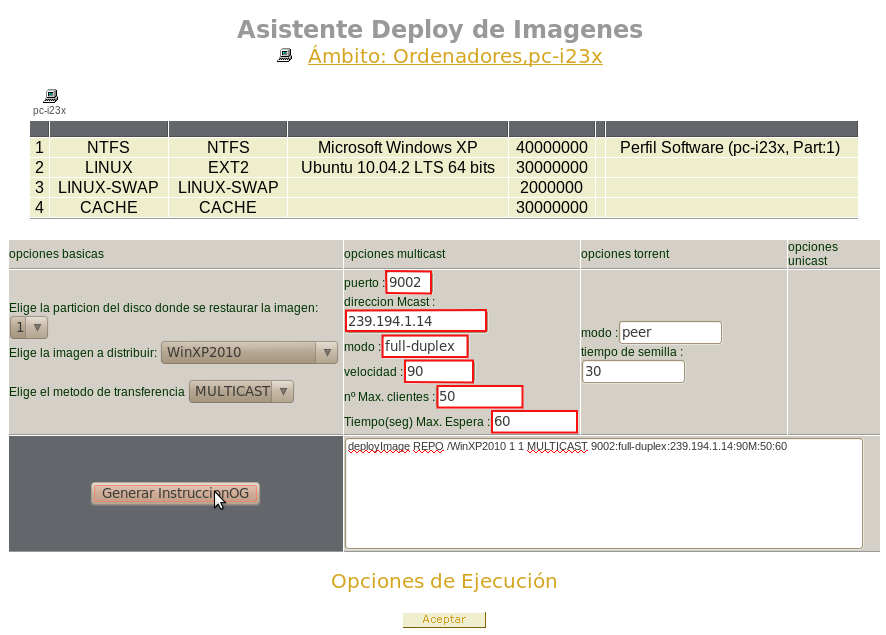
Example deployImage Torrent in Seeder mode: sharing while download
Figure above is the image deploy wizard for a classroom scope. Instruction is generated with the default values assigned to the classroom.
- Seeder mode: clients while downloading image, shared it.
- P2P time: when the image is downloading, the computer is sharing X seconds (in our case 60) the image.
In the classroom, there are computers with the image in the cache. These computers detect it and automatically restore it from the cache.
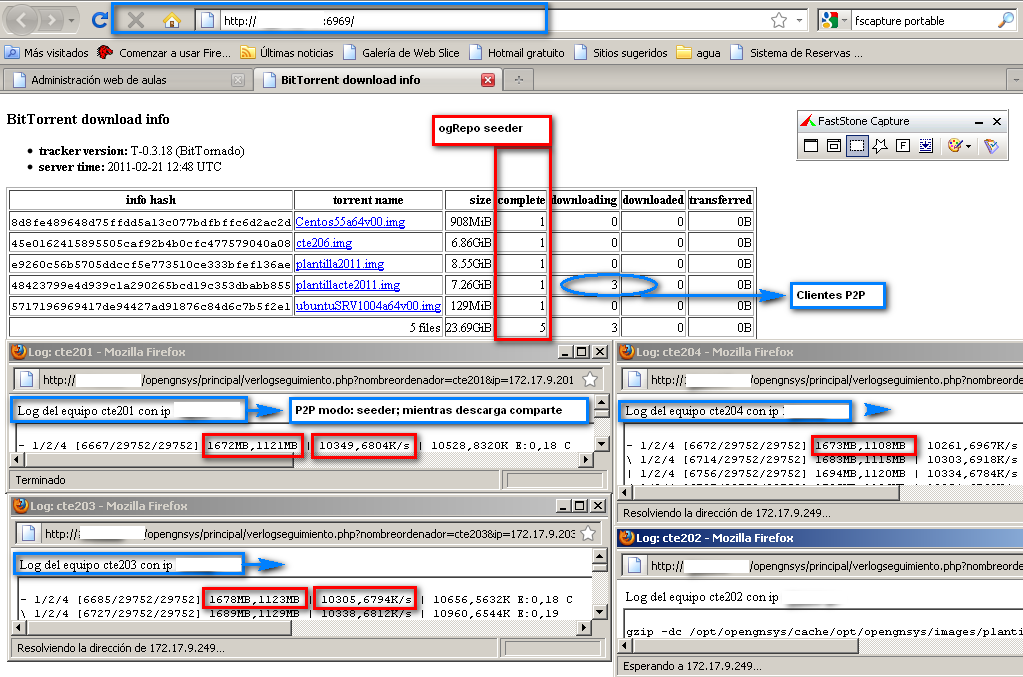
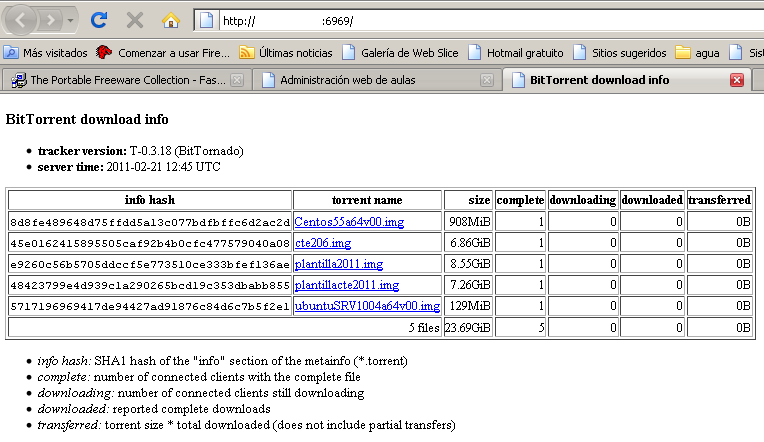
The next figure contains the tracker information (port 6969 of our repository).
- Show images ogRepo is seeding.

The next figure we can see how tracker detects the clients that are downloading an image. In the clients log, we see that they are behaving as seeder, ie, while donwloading share.

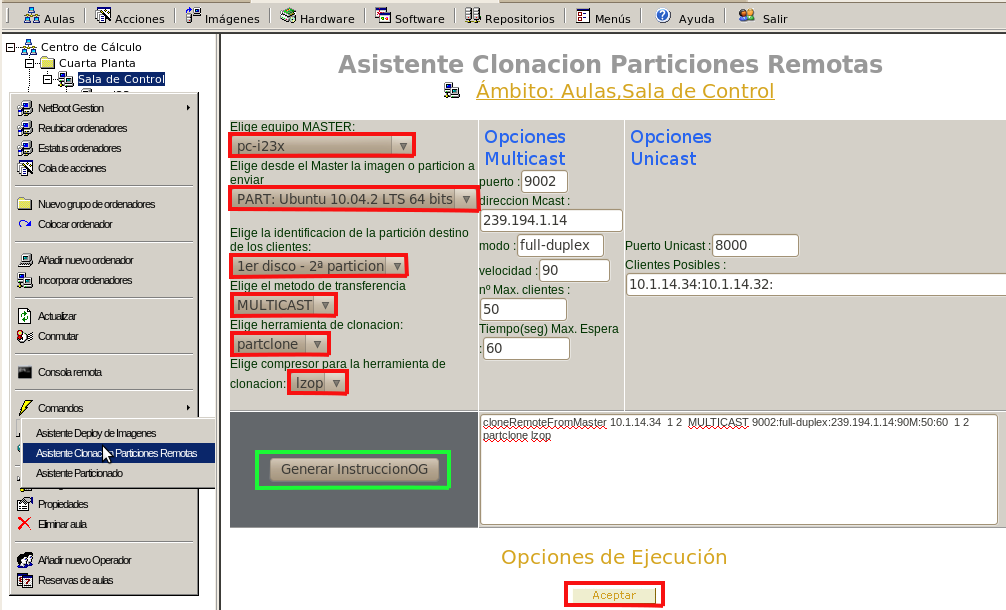
Deploy Wizard Remote Partitions
This wizard allow to use an OpenGnSys client to send images of operating systems -located in the cache or in the repository- and those operating systems installed in the corresponding partition. Any OpenGnSys client computer can assume the role of 'master' to send images of the repository assigned or the operating systems installed in the partitions. If we want to define a computer as master, for example, to generate images of the operating systems in the cache partition, and to used as source for the others computers, we must to registered as repository.
We can deploy from a client that have the role of master or server:
- directly partitions without create an image
- images in cache (the computer must to registered as repository and to have the image assigned)
- images from the repo. First bring it to the computer via UNICAST and then will serve to the rest of the scope via UNISCAST or MULTICAST
We are usign work method of Images Deploy Wizard in the steps and in the info of MULTICAST protocol that used to transfer the images.
To do this action, in tab Classrooms right-click on the scope and Deploy Wizard Remote Partitions . The scope can not be only a computer.
It is show a form to fill and it is allow modify default parameters.
- master: It is the computer that serves the partition or image to deploy to the other computers.
- image or partition to send: source. Once we chose the master is a list of selection possibilities, distinguishing the three types mentioned: PART, IMG-REPO or IMG-CACHE
- target partition
- transfer method: Transmission protocol (UNICAST or MULTICAST)
- deployment tool: It is needed to deploy a partition. If it is an image the system will detect.
- compression: It is needed to deploy a partition. If it is an image the system will detect.
To finish, clicking on Generate OG Command for create the code to use for the clients and click on accept to send it.

If we have a computer with a partition smaller than datas from source partition, the computer will be detected this and not join to multicast session.
Attachments (10)
- clonacion_distribuida.png (121.6 KB) - added by 12 years ago.
- deployImage_torrent03.png (85.6 KB) - added by 12 years ago.
- deployImage_torrent02.png (27.2 KB) - added by 12 years ago.
- deployImage_torrent01.png (11.5 KB) - added by 12 years ago.
- deployImage_multicast.png (74.2 KB) - added by 12 years ago.
- imagen_crear.png (64.0 KB) - added by 12 years ago.
- imagen_nueva.png (43.3 KB) - added by 12 years ago.
- deployImage.2.png (112.1 KB) - added by 12 years ago.
- deployImage.png (112.1 KB) - added by 12 years ago.
- clonacion_comando.png (74.2 KB) - added by 12 years ago.
Download all attachments as: .zip
